


Stone Model Building

Peter Meadows' first attempt with Model Builder is a massive succes.
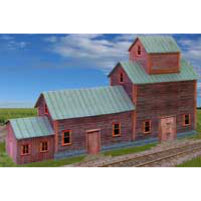
"I am really happy with the outcome. The model was based (loosely) on the photo that I downloaded from Google. I took a hint from John Wiffen's models for the roof. I extended the tiles downwards by about 1mm for each row. After sticking them into thin cardstock, I cut each row separately 1mm above the front edge of the tile. I then stuck each row down separately, starting from the bottom and overlapping by 1mm. This let your 'shadows' show but also gave a realistic profile for the tiles. The walls are two layers of cardstock with the windows on the inner layer and the outer layer cut out to reveal them. I also 'glazed' by also printing the widows onto clear plastic and carefully superimposing them. I reckon the whole thing looks pretty authentic, so thanks for your software. I am now free to design a whole village based on where I used to live in Scotland 45 years ago!"
We look forward to seeing more!